
Crafting a wax seal is an enduring practice that has been honed over generations bringing a sense of sophistication and uniqueness to notes, invitations and gift packages. In our era dominated by technology the act of crafting a seal has evolved beyond functionality – it now serves as a means of self expression and a link to the past. If you're interested in mastering the art of seal making this detailed guide will lead you through each step of the process.
Reasons, for Crafting Seals;
Before delving into the methods lets consider why someone might choose to create their seal;
Personalization. A wax seal offers a way to add your touch to correspondence, event invitations or presents setting them apart from the ordinary.
Historical Connection. For centuries sealing wax has been utilized to authenticate documents and messages. Crafting your seal enables you to engage with this rooted historical practice.
Artistic Outlet. Wax seal crafting is a tactile art form that empowers you to showcase your creativity through selecting wax hues, stamp patterns and decorative elements.
Crafting a designed wax seal can leave a lasting impression. Bring joy to the recipient adding an elegant touch of sophistication and care to your message or gift.
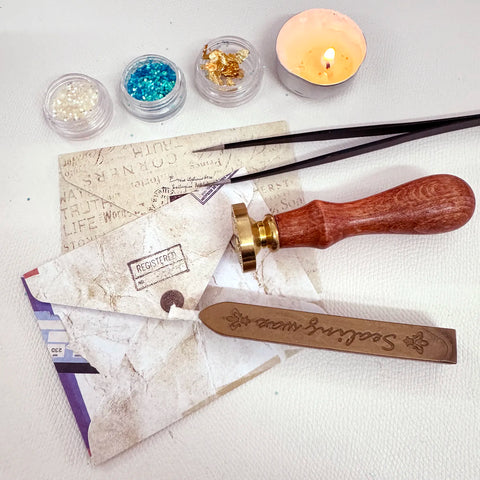
Explore our website for a variety of sealing wax options to help you create your seal, including classic wax sticks, convenient wax beads, melting tools, like spoons and furnaces and even hot glue guns. Our selection caters to preferences and skill levels ensuring there's something for everyone.
Step 1; Gathering Your Supplies
To craft a seal gather the following materials;
Sealing Wax
wax sticks; Ideal for beginners and those who prefer traditional methods; available in various colors for customization.
Wax beads; Offer melting than sticks with the flexibility to mix colors; require a melting furnace or hot glue gun.
Heating Tools
Wax melting spoon and candle; A tried and tested duo for melting wax sticks.
Melting furnace; Specifically designed for melting wax beads and easy temperature control. If you don't have wax beads you can use a hot glue gun as an option, for melting wax. It's convenient and versatile for both melting. Applying the wax.
Wax Stamp
Your seals feature the wax stamp should be engraved with your design, such as a monogram, family crest or decorative pattern. Opt for a top quality stamp crafted from materials like brass for results.
Lighter or Matches
Needed to light the candle or ignite the melting furnace.
Additional Tools (Optional)
Consider using a wax pen or crayon to add accents.
Get creative with elements, like glitter, dried flowers or ribbons to enhance your seal.
Use a heat surface or silicone mat to catch any drips of melted wax.
Step 2; Melting the Sealing Wax
After gathering all your materials it's time to melt the sealing wax. The method may vary depending on whether you're working with wax sticks or beads.
For Wax Sticks;
Cut the sticks into pieces. Place them in a melting spoon.
Hold the spoon over the candle flame moving it back and forth to ensure even heating distribution.Please be patient. Let the wax melt completely until there are no pieces left.
Tip, from an expert; The best temperature for melting wax sticks is between 200 250°F (93 121°C). If the wax gets too hot it might change color. make a seal. If its not hot enough the wax may not flow smoothly.
For Wax Beads;
Follow the instructions provided for your melting furnace or hot glue gun to melt the wax beads.
Expert advice; When using a melting furnace, be mindful of the temperature control. Different types of wax have melting points. Overheating can affect the seal quality.
If you're using a hot glue gun be cautious not to overheat the wax beads as they could change color or produce a smell.
Step 3; Pouring the Sealing Wax
Now that your wax is melted it's time to create the seal. Here are some guidelines, for pouring the wax;
Decide where you want to make the seal; You have the option to create a seal directly on the item you're sealing, like an envelope or gift box or pour the wax on a heat surface first and then transfer the seal.
Choose how big you want your seal to be; The size of your seal will depend on how wax you pour. If you want a seal pour a pool of wax.
Get creative with your design; Mix colors of wax for unique patterns and designs.. Get more creative by adding glitter or dried flowers to the melted wax before pouring it.
Pro Tip; To avoid drips and ensure a pool of wax keep the spoon. Pouring tool close, to the surface as you pour the wax.
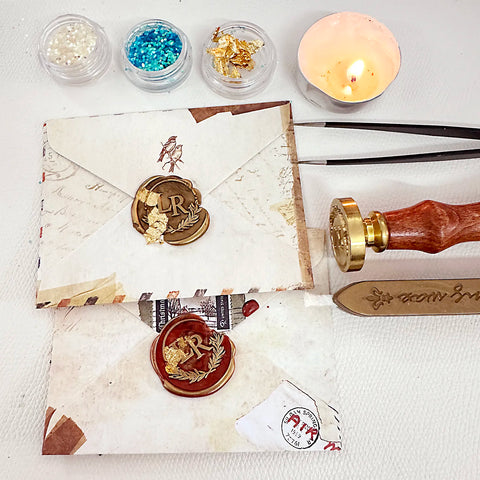
Step 4; Apply the Pattern
Now comes the exciting part. Creating your one of a kind seal with your stamp;
Once the poured wax has cooled slightly but is still moldable it's time to press your design into it with your stamp.
Hold the stamp above the surface. Firmly press it down evenly into the wax.
Make sure to press down for an imprint but handle the wax delicately to prevent any cracks.
Hold the stamp steady for 2 3 seconds. Then lift it up slowly in a motion keeping it parallel, to the surface.
Bonus Tip; To achieve results play around with levels of pressure and wax temperatures. Warmer wax flows easily while cooler wax is sturdier and might need a bit pressure.
Like that you've crafted a unique and beautiful wax seal! Take a moment to admire your work and think about adding a touch with a wax pen or crayon for added flair.
Innovative. Inspiration
While sealing letters is the use of wax seals there are ways to express your creativity. Here are some suggestions to spark your imagination;
Wedding invites; Personalize your wedding invitations with a wax seal featuring your initials or a special symbol.
Gift presentation; Elevate gift boxes into art pieces, by embellishing them with decorative wax seals.
DIY projects; Integrate wax seals into your journals, candles or other crafts for that appeal.4. Home decoration tip; Craft distinctive wall. Ornamental accents, by arranging multiple wax seals within a frame or onto a tray.
Special gestures and tokens; Present your guests or loved ones with enduring keepsakes by crafting personalized wax seal tokens or souvenirs.
Maintenance and Cleaning Guidelines
To ensure the longevity of your wax seal crafting tools it is crucial to care for and clean them. Here are some suggestions;
Wax stamps; After each use delicately remove any wax from the stamps surface using a lint free cloth. Avoid cleaners or vigorous scrubbing to prevent damage, to the design.
Melting spoons and furnaces; Allow the tools to cool completely before cleaning. Use a cloth or paper towel to wipe off any leftover wax while it's still warm and malleable.
Stubborn residue; If faced with wax buildup gently warm the area using a hairdryer or by placing the tool in a slightly warm oven for a few minutes. The heat will soften the wax facilitating its removal.
Remember to keep your wax seal making tools in a spot away, from direct sunlight and extreme temperatures that can lead the wax to melt or become brittle.
Common Problems and Solutions
seasoned seal makers may face issues at times. Here are some typical challenges and how to address them;
Wax sticking to the stamp; This may occur if the stamp isn't properly prepared or if the wax is too hot. To prevent sticking make sure to clean the stamp and lightly grease it with a releasing agent or a thin layer of oil before each use.
Cracked or imperfect seals; Cracks or imperfections may result from wax, force when applying the stamp or handling the wax before it fully cools and hardens. Let the wax cool completely before touching it and apply pressure when stamping.
Bubbles or uneven surfaces; Trapped air or impurities, in the wax could cause bubbles or uneven surfaces. To reduce this issue ensure your wax is completely melted and free of any pieces or debris before pouring.
The Importance of Wax Seals Throughout History
Crafting a seal goes beyond being an endeavor. It links us to a deep cultural and historical legacy that has endured over many generations. The tradition of utilizing wax seals dates back, to societies, where they served as a means to authenticate documents and letters.
In Europe wax seals symbolized authority and prestige with the elite using seals to mark their official communications and edicts. The craft of seal making was highly esteemed with artisans entrusted to fashion unique seals for their benefactors.
Over time the purpose of wax seals shifted from practicality to an expression as individuals and clans custom seals as emblems of their identity and lineage. Today creating a seal serves as a bridge, to this past and customs, enabling flair and artistic freedom.Whether you opt to inscribe your family emblem, a monogram or an ornamental pattern the wax seal you craft holds significance and narrates a tale. It serves as a link, to history. Serves as a prompt of the lasting impact of skillful artistry and meticulousness.